Creating a Kafka Streaming Application
Apache Kafka is a distributed streaming platform. You can use Kafka to stream data directly from an application into HeavyDB.
This example is a bare-bones click-through application that captures user activity.
This example assumes you have already installed and configured Apache Kafka. See the Kafka website. The FlavorPicker example also has dependencies on Swing/AWT classes. See the Oracle Java SE website.
Creating a Kafka Producer
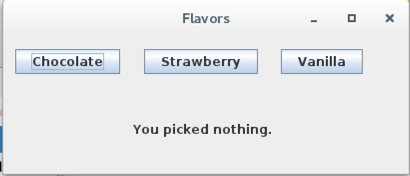
FlavorPicker.java sends the choice of Chocolate, Strawberry, or Vanilla to the Kafka broker. This example uses only one column of information, but the mechanism is the same for records of any size.
package flavors;

// Swing/AWT Interface classes
import java.awt.event.ActionEvent;
import java.awt.event.ActionListener;
import java.awt.EventQueue;
import javax.swing.JButton;
import javax.swing.JFrame;
import javax.swing.JLabel;

// Generic Java properties object
import java.util.Properties;

// Kafka Producer-specific classes
import org.apache.kafka.clients.producer.KafkaProducer;
import org.apache.kafka.clients.producer.Producer;
import org.apache.kafka.clients.producer.ProducerRecord;

public class FlavorPicker{

    private JFrame frmFlavors;
    private Producer producer;
    /**
     * Launch the application.
     */
    public static void main(String[] args) {
       EventQueue.invokeLater(new Runnable() {
          public void run() {
             try {
                FlavorPicker window = new FlavorPicker(args);
                window.frmFlavors.setVisible(true);
             } catch (Exception e) {
                e.printStackTrace();
             }
          }
       });
    }

    /**
     * Create the application.
     */
    public FlavorPicker(String[] args) {
       initialize(args);
    }

    /**
     * Initialize the contents of the frame.
     */
    private void initialize(String[] args) {
       frmFlavors = new JFrame();
       frmFlavors.setTitle("Flavors");
       frmFlavors.setBounds(100, 100, 408, 177);
       frmFlavors.setDefaultCloseOperation(JFrame.EXIT_ON_CLOSE);
       frmFlavors.getContentPane().setLayout(null);

       final JLabel lbl_yourPick = new JLabel("You picked nothing.");
       lbl_yourPick.setBounds(130, 85, 171, 15);
       frmFlavors.getContentPane().add(lbl_yourPick);

       JButton button = new JButton("Strawberry");
       button.addActionListener(new ActionListener() {
          public void actionPerformed(ActionEvent arg0) {
             lbl_yourPick.setText("You picked strawberry.");
             pick(args,1);
          }
       });
       button.setBounds(141, 12, 114, 25);
       frmFlavors.getContentPane().add(button);

       JButton btnVanilla = new JButton("Vanilla");
       btnVanilla.addActionListener(new ActionListener() {
          public void actionPerformed(ActionEvent e) {
             lbl_yourPick.setText("You picked vanilla.");
             pick(args,2);
          }
       });
       btnVanilla.setBounds(278, 12, 82, 25);
       frmFlavors.getContentPane().add(btnVanilla);


       JButton btnChocolate = new JButton("Chocolate");
       btnChocolate.addActionListener(new ActionListener() {
          public void actionPerformed(ActionEvent e) {
             lbl_yourPick.setText("You picked chocolate.");
             pick(args, 0);
          }
       });

       btnChocolate.setBounds(12, 12, 105, 25);
       frmFlavors.getContentPane().add(btnChocolate);
    }
    public void pick(String[] args,int x) {
         String topicName = args[0].toString();
         String[] value = {"chocolate","strawberry","vanilla"};

         // Set the producer configuration properties.
         Properties props = new Properties();
            props.put("bootstrap.servers", "localhost:9097");
            props.put("acks", "all");
            props.put("retries", 0);
            props.put("batch.size", 100);
        props.put("linger.ms", 1);
        props.put("buffer.memory", 33554432);
        props.put("key.serializer",
            "org.apache.kafka.common.serialization.StringSerializer");
        props.put("value.serializer",
            "org.apache.kafka.common.serialization.StringSerializer");

     // Instantiate a producerSampleJDBC
     producer = new KafkaProducer(props);

     // Send a 1000 record stream to the Kafka Broker
     for (int y=0; y<1000; y++){
         producer.send(new ProducerRecord(topicName, value[x]));
     }
   }
}//End FlavorPicker.java
Creating a Kafka Consumer
FlavorConsumer.java polls the Kafka broker periodically, pulls any new topics added since the last poll, and loads them to HeavyDB. Ideally, each batch should be fairly substantial in size, minimally 1,000 rows or more, so as not to overburden the server.
package flavors;

import java.util.Properties;
import java.util.Arrays;
import org.apache.kafka.clients.consumer.KafkaConsumer;
import org.apache.kafka.clients.consumer.ConsumerRecords;
import org.apache.kafka.clients.consumer.ConsumerRecord;

//JDBC
import java.sql.Connection;
import java.sql.DriverManager;
import java.sql.PreparedStatement;
import java.sql.SQLException;

// Usage:\nFlavorConsumer

public class FlavorConsumer {
    public static void main(String[] args) throws Exception {
       if (args.length < 2) {
          System.out.println("Usage:\n\nFlavorConsumer  ");
          return;
       }
       // Configure the Kafka Consumer
       String topicName = args[0].toString();
       Properties props = new Properties();

       props.put("bootstrap.servers", "localhost:9097"); // Use 9097 so as not
                                              // to collide with
                                              // Heavy Immerse
       props.put("group.id", "test");
       props.put("enable.auto.commit", "true");
       props.put("auto.commit.interval.ms", "1000");
       props.put("session.timeout.ms", "30000");
       props.put("key.deserializer", "org.apache.kafka.common.serialization.StringDeserializer");
       props.put("value.deserializer", "org.apache.kafka.common.serialization.StringDeserializer");
       KafkaConsumer consumer = new KafkaConsumer(props);

       // Subscribe the Kafka Consumer to the topic.
       consumer.subscribe(Arrays.asList(topicName));

       // print the topic name
       System.out.println("Subscribed to topic " + topicName);

       String flavorValue = "";

       while (true) {
          ConsumerRecords records = consumer.poll(1000);

          // Create connection and prepared statement objects
          Connection conn = null;
          PreparedStatement pstmt = null;

          try {
             // JDBC driver name and database URL
             final String JDBC_DRIVER = "com.mapd.jdbc.MapDDriver";
             final String DB_URL = "jdbc:heavyai:localhost:6274:heavyai";

             // Database credentials
             final String USER = "heavyai";
             final String PASS = args[1].toString();

             // STEP 1: Register JDBC driver
             Class.forName(JDBC_DRIVER);

             // STEP 2: Open a connection
             conn = DriverManager.getConnection(DB_URL, USER, PASS);

             // STEP 3: Prepare a statement template
             pstmt = conn.prepareStatement("INSERT INTO flavors VALUES (?)");

             // STEP 4: Populate the prepared statement batch
             for (ConsumerRecord record : records) {
                flavorValue = record.value();
                pstmt.setString(1, flavorValue);
                pstmt.addBatch();
             }

             // STEP 5: Execute the batch statement (send records to HeavyDB)
             pstmt.executeBatch();

             // Commit and close the connection.
             conn.commit();
             conn.close();

          } catch (SQLException se) {
             // Handle errors for JDBC
             se.printStackTrace();

          } catch (Exception e) {
             // Handle errors for Class.forName
             e.printStackTrace();
          } finally {

             try {
                if (pstmt != null) {
                   pstmt.close();
                }
             } catch (SQLException se2) {
             } // nothing we can do

             try {
                if (conn != null) {
                   conn.close();
                }
             } catch (SQLException se) {
                se.printStackTrace();
             } // end finally try

          } // end try
       } // end main
    }
}// end FlavorConsumer}
Running the Kafka Click-through Application
To run the application, you need to perform the following tasks:
Compile FlavorConsumer.java and FlavorPicker.java.
Create a table in HeavyDB.
Start the Zookeeper server.
Start the Kafka server.
Start the Kafka consumer.
Start the Kafka producer.
View the results using
heavysqland Heavy Immerse.
Compile FlavorConsumer.java and FlavorPicker.java, storing the resulting class files in
$HEAVYAI_PATH/SampleCode/kafka-clickthrough/bin.Using heavysql, create the table flavors with one column, flavor, in HeavyDB. See heavysql for more information.
heavysql> CREATE TABLE flavors (flavor TEXT ENCODING DICT);Open a new terminal window.
Go to your
kafkadirectory.Start the Zookeeper server with the following command.
./bin/zookeeper-server-start.sh config/zookeeper.propertiesOpen a new terminal window.
Go to the
kafkadirectory.Start the Kafka server with the following command.
./bin/kafka-server-start.sh config/server.propertiesOpen a new terminal window.
Go to the
kafkadirectory.Create a new Kafka topic with the following command. This starts a basic broker with only one replica and one partition. See the Kafka documentation for more information.
bin/kafka-topics.sh --create --zookeeper localhost:2181 --replication-factor 1
--partitions 1 --topic myflavors
Open a new terminal window.
Launch FlavorConsumer with the following command, substituting the actual path to the Kafka directory and your HeavyDB password.
java -cp .:<kafka-directory-path>/libs/*:$HEAVYAI_PATH/bin/*:$HEAVYAI_PATH/SampleCode/kafka-clickthrough/bin flavors.FlavorConsumer myflavors <myPassword>Launch FlavorPicker with the following command.
java -cp .:<kafka-directory-path>/libs/*:$HEAVYAI_PATH/bin/*:$HEAVYAI_PATH/SampleCode/kafka-clickthrough/bin flavors.FlavorPicker myflavorsClick to create several records for Chocolate, Strawberry, and Vanilla. Each click generates 1,000 records.

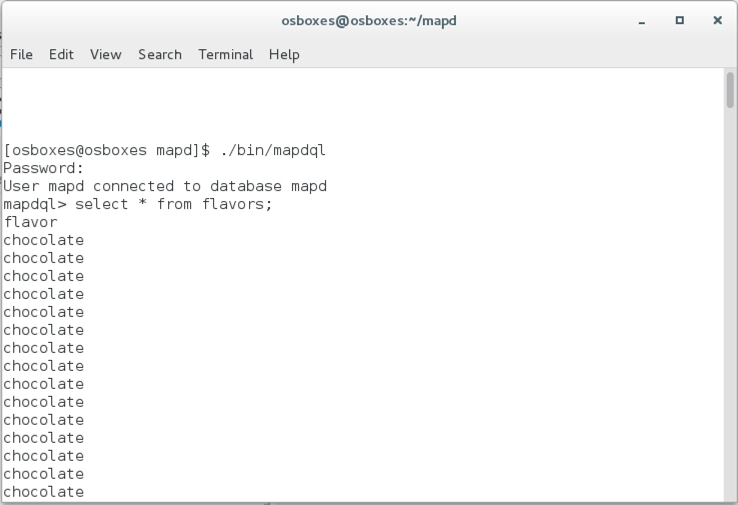
16. Use heavysql to see that the results have arrived in HeavyDB.

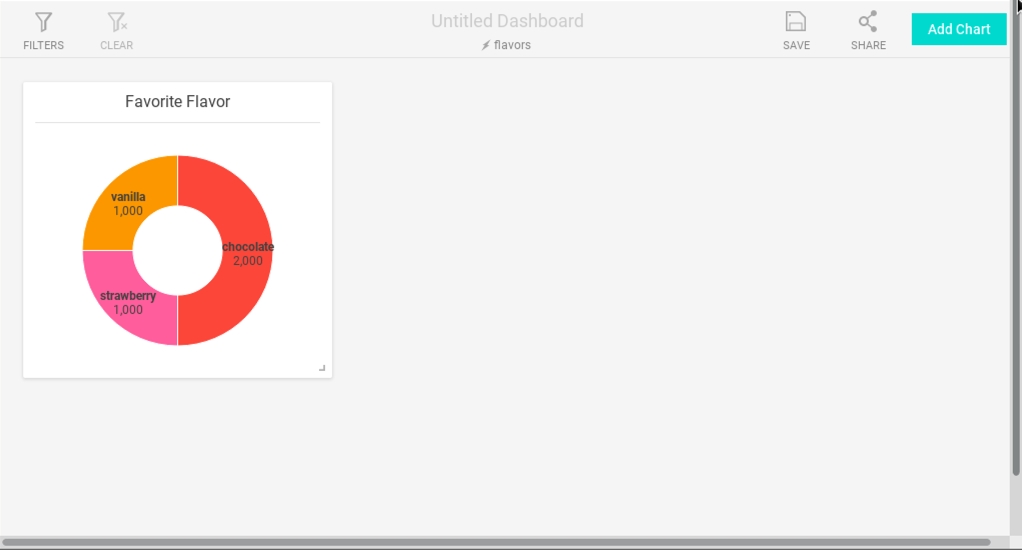
17. Use Immerse to visualize the results.
