HEAVY.AI Docs
v8.1.0
v8.1.0
  • Welcome to HEAVY.AI Documentation
  • Overview
    • Overview
    • Release Notes
  • Installation and Configuration
    • System Requirements
      • Hardware Reference
      • Software Requirements
      • Licensing
    • Installation
      • Free Version
      • Installing on Docker
        • HEAVY.AI Installation using Docker on Ubuntu
      • Installing on Ubuntu
        • HEAVY.AI Installation on Ubuntu
        • Install NVIDIA Drivers and Vulkan on Ubuntu
      • Installing on Rocky Linux / RHEL
        • HEAVY.AI Installation on RHEL
        • Install NVIDIA Drivers and Vulkan on Rocky Linux and RHEL
      • Getting Started on AWS
      • Getting Started on GCP
      • Getting Started on Azure
      • Getting Started on Kubernetes (BETA)
      • Upgrading
        • Upgrading HEAVY.AI
        • Upgrading from Omnisci to HEAVY.AI 6.0
        • CUDA Compatibility Drivers
      • Uninstalling
      • Ports
    • Services and Utilities
      • Using Services
      • Using Utilities
    • Executor Resource Manager
    • Configuration Parameters
      • Overview
      • Configuration Parameters for HeavyDB
      • Configuration Parameters for HEAVY.AI Web Server
      • Configuration Parameters for HeavyIQ
    • Security
      • Roles and Privileges
        • Column-Level Security
      • Connecting Using SAML
      • Implementing a Secure Binary Interface
      • Encrypted Credentials in Custom Applications
      • LDAP Integration
    • Distributed Configuration
  • Loading and Exporting Data
    • Supported Data Sources
      • Kafka
      • Using HeavyImmerse Data Manager
      • Importing Geospatial Data
    • Command Line
      • Loading Data with SQL
      • Exporting Data
  • SQL
    • Data Definition (DDL)
      • Datatypes
      • Users and Databases
      • Tables
      • System Tables
      • Views
      • Policies
      • Comment
    • Data Manipulation (DML)
      • SQL Capabilities
        • ALTER SESSION SET
        • ALTER SYSTEM CLEAR
        • DELETE
        • EXPLAIN
        • INSERT
        • KILL QUERY
        • LIKELY/UNLIKELY
        • SELECT
        • SHOW
        • UPDATE
        • Arrays
        • Logical Operators and Conditional and Subquery Expressions
        • Table Expression and Join Support
        • Type Casts
      • Geospatial Capabilities
        • Uber H3 Hexagonal Modeling
      • Functions and Operators
      • System Table Functions
        • generate_random_strings
        • generate_series
        • tf_compute_dwell_times
        • tf_feature_self_similarity
        • tf_feature_similarity
        • tf_geo_rasterize
        • tf_geo_rasterize_slope
        • tf_graph_shortest_path
        • tf_graph_shortest_paths_distances
        • tf_load_point_cloud
        • tf_mandelbrot*
        • tf_point_cloud_metadata
        • tf_raster_contour_lines; tf_raster_contour_polygons
        • tf_raster_graph_shortest_slope_weighted_path
        • tf_rf_prop_max_signal (Directional Antennas)
        • ts_rf_prop_max_signal (Isotropic Antennas)
        • tf_rf_prop
      • Window Functions
      • Reserved Words
      • SQL Extensions
      • HeavyIQ LLM_TRANSFORM
  • HeavyImmerse
    • Introduction to HeavyImmerse
    • Admin Portal
    • Control Panel
    • Working with Dashboards
      • Dashboard List
      • Creating a Dashboard
      • Configuring a Dashboard
      • Duplicating and Sharing Dashboards
    • Measures and Dimensions
    • Using Parameters
    • Using Filters
    • Using Cross-link
    • Chart Animation
    • Multilayer Charts
    • SQL Editor
    • Customization
    • Joins (Beta)
    • Chart Types
      • Overview
      • Bubble
      • Choropleth
      • Combo
      • Contour
      • Cross-Section
      • Gauge
      • Geo Heatmap
      • Heatmap
      • Linemap
      • Number
      • Pie
      • Pointmap
      • Scatter Plot
      • Skew-T
      • Table
      • Text Widget
      • Wind Barb
    • Deprecated Charts
      • Bar
      • Combo - Original
      • Histogram
      • Line
      • Stacked Bar
    • HeavyIQ SQL Notebook
  • HEAVYIQ Conversational Analytics
    • HeavyIQ Overview
      • HeavyIQ Guidance
  • HeavyRF
    • Introduction to HeavyRF
    • Getting Started
    • HeavyRF Table Functions
  • HeavyConnect
    • HeavyConnect Release Overview
    • Getting Started
    • Best Practices
    • Examples
    • Command Reference
    • Parquet Data Wrapper Reference
    • ODBC Data Wrapper Reference
    • Raster Data Wrapper Reference
  • HeavyML (BETA)
    • HeavyML Overview
    • Clustering Algorithms
    • Regression Algorithms
      • Linear Regression
      • Random Forest Regression
      • Decision Tree Regression
      • Gradient Boosting Tree Regression
    • Principal Components Analysis
  • Python / Data Science
    • Data Science Foundation
    • JupyterLab Installation and Configuration
    • Using HEAVY.AI with JupyterLab
    • Python User-Defined Functions (UDFs) with the Remote Backend Compiler (RBC)
      • Installation
      • Registering and Using a Function
      • User-Defined Table Functions
      • RBC UDF/UDTF Example Notebooks
      • General UDF/UDTF Tutorial Notebooks
      • RBC API Reference
    • Ibis
    • Interactive Data Exploration with Altair
    • Additional Examples
      • Forecasting with HEAVY.AI and Prophet
  • APIs and Interfaces
    • Overview
    • heavysql
    • Thrift
    • JDBC
    • ODBC
    • Vega
      • Vega Tutorials
        • Vega at a Glance
        • Getting Started with Vega
        • Getting More from Your Data
        • Creating More Advanced Charts
        • Using Polys Marks Type
        • Vega Accumulator
        • Using Transform Aggregation
        • Improving Rendering with SQL Extensions
      • Vega Reference Overview
        • data Property
        • projections Property
        • scales Property
        • marks Property
      • Migration
        • Migrating Vega Code to Dynamic Poly Rendering
      • Try Vega
    • RJDBC
    • SQuirreL SQL
    • heavyai-connector
  • Tutorials and Demos
    • Loading Data
    • Using Heavy Immerse
    • Hello World
    • Creating a Kafka Streaming Application
    • Getting Started with Open Source
    • Try Vega
  • Troubleshooting and Special Topics
    • FAQs
    • Troubleshooting
    • Vulkan Renderer
    • Optimizing
    • Known Issues and Limitations
    • Logs and Monitoring
    • Archived Release Notes
      • Release 6.x
      • Release 5.x
      • Release 4.x
      • Release 3.x
Powered by GitBook
On this page
  • Registering Your SAML Application in Okta
  • Configuring SAML for Your HEAVY.AI Application
  • Auto-Creating Users with SAML
  • Creating Users Manually
  • Verifying SAML Configuration
Export as PDF
  1. Installation and Configuration
  2. Security

Connecting Using SAML

PreviousColumn-Level SecurityNextImplementing a Secure Binary Interface

Security Assertion Markup Language (SAML) is used for exchanging authentication and authorization data between security domains. SAML uses security tokens containing assertions (statements that service providers use to make decisions about access control) to pass information about a principal (usually an end user) between a SAML authority, named an Identity Provider (IdP), and a SAML consumer, named a Service Provider (SP). SAML enables web-based, cross-domain, single sign-on (SSO), which helps reduce the administrative overhead of sending multiple authentication tokens to the user.

If you use SAML for authentication to HEAVY.AI, and SAML login fails, HEAVY.AI automatically falls back to log in using LDAP if it is configured.

If both SAML and LDAP authentication fail, you are authenticated against a locally stored password, but only if the allow-local-auth-fallback flag is set.

These instructions use as the IdP and HEAVY.AI as the SP in an SP-initiated workflow, similar to the following:

  1. A user uses a login page to connect to HEAVY.AI.

  2. The HEAVY.AI login page redirects the user to the Okta login page.

  3. The user signs in using an Okta account. (This step is skipped if the user is already logged in to Okta.)

  4. Okta returns a base64-encoded SAML Response to the user, which contains a SAML Assertion that the user is allowed to use HEAVY.AI. If configured, it also returns a list of SAML Groups assigned to the user.

  5. Okta redirects the user to the HEAVY.AI login page together with the SAML response (a token).

  6. HEAVY.AI verifies the token, and retrieves the user name and groups. Authentication and authorization is complete.

In addition to Okta, the following SAML providers are also supported:

Registering Your SAML Application in Okta

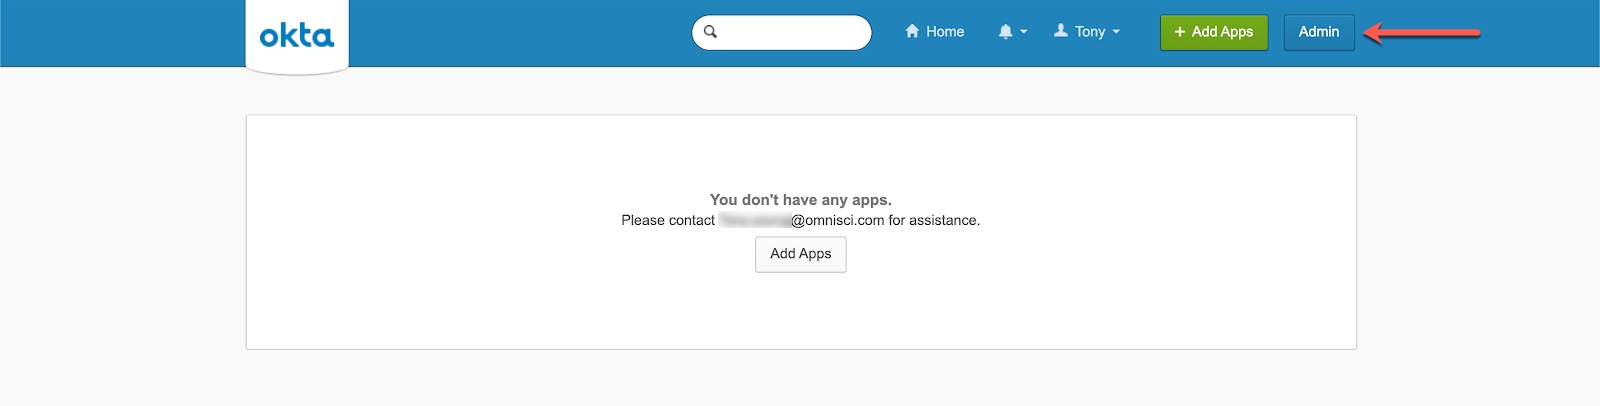
1) Log into your Okta account and click the Admin button.

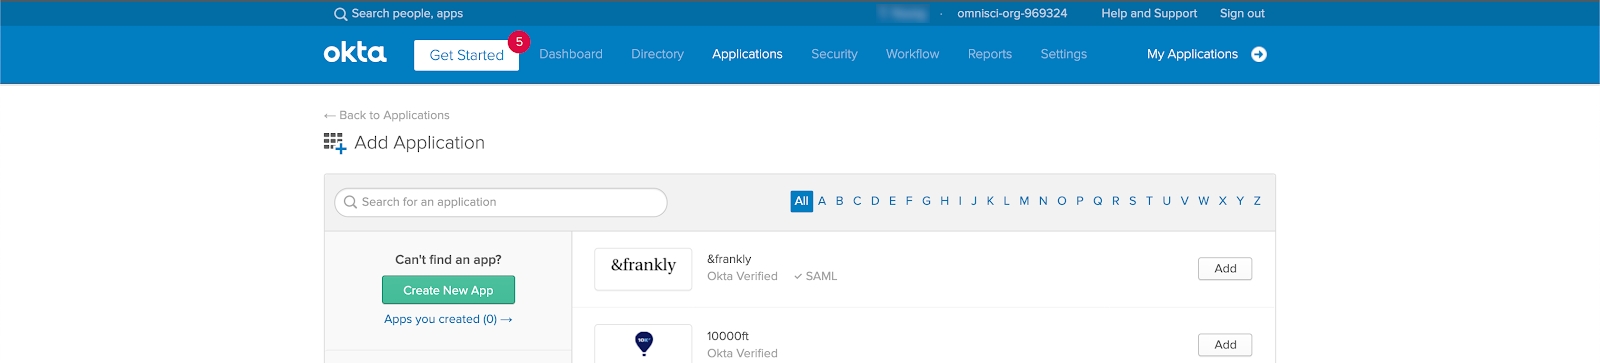
2) From the Applications menu, select Applications.

3) Click the Add Application button.

4) On the Add Application screen, click Create New App.

5) On the Create a New Application Integration page, set the following details:

  • Platform: Web

  • Sign on Method: SAML 2.0

    And then, click Create.

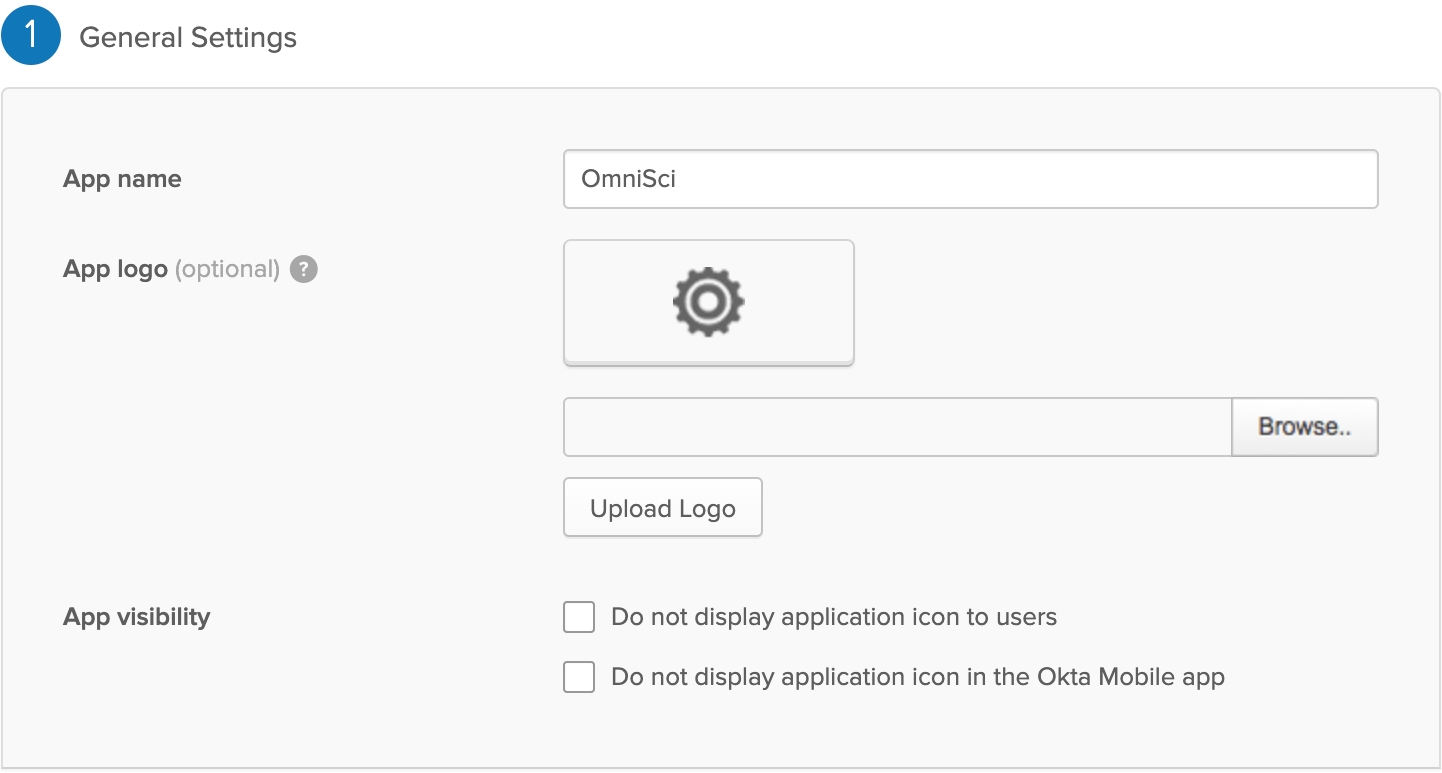
6) On the Create SAML Integration page, in the App name field, type Heavyai and click Next.

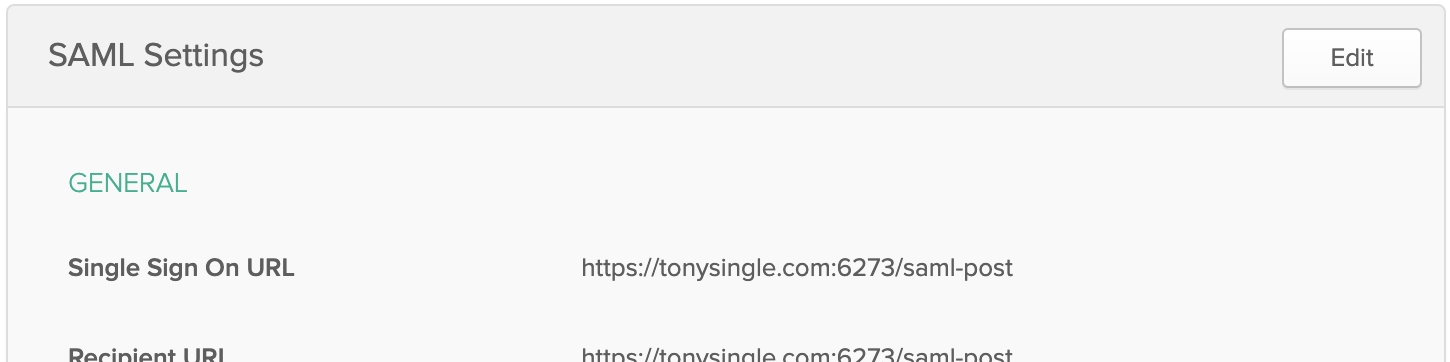
7) In the SAML Settings page, enter the following information:

  • Audience URI (SP Entity ID): Your Heavy Immerse web URL with the suffix saml-post.

  • Default RelayState: Forward slash (/).

  • Application username: HEAVY.AI recommends using the email address you used to log in to Okta.

Leave other settings at their default values, or change as required for your specific installation.

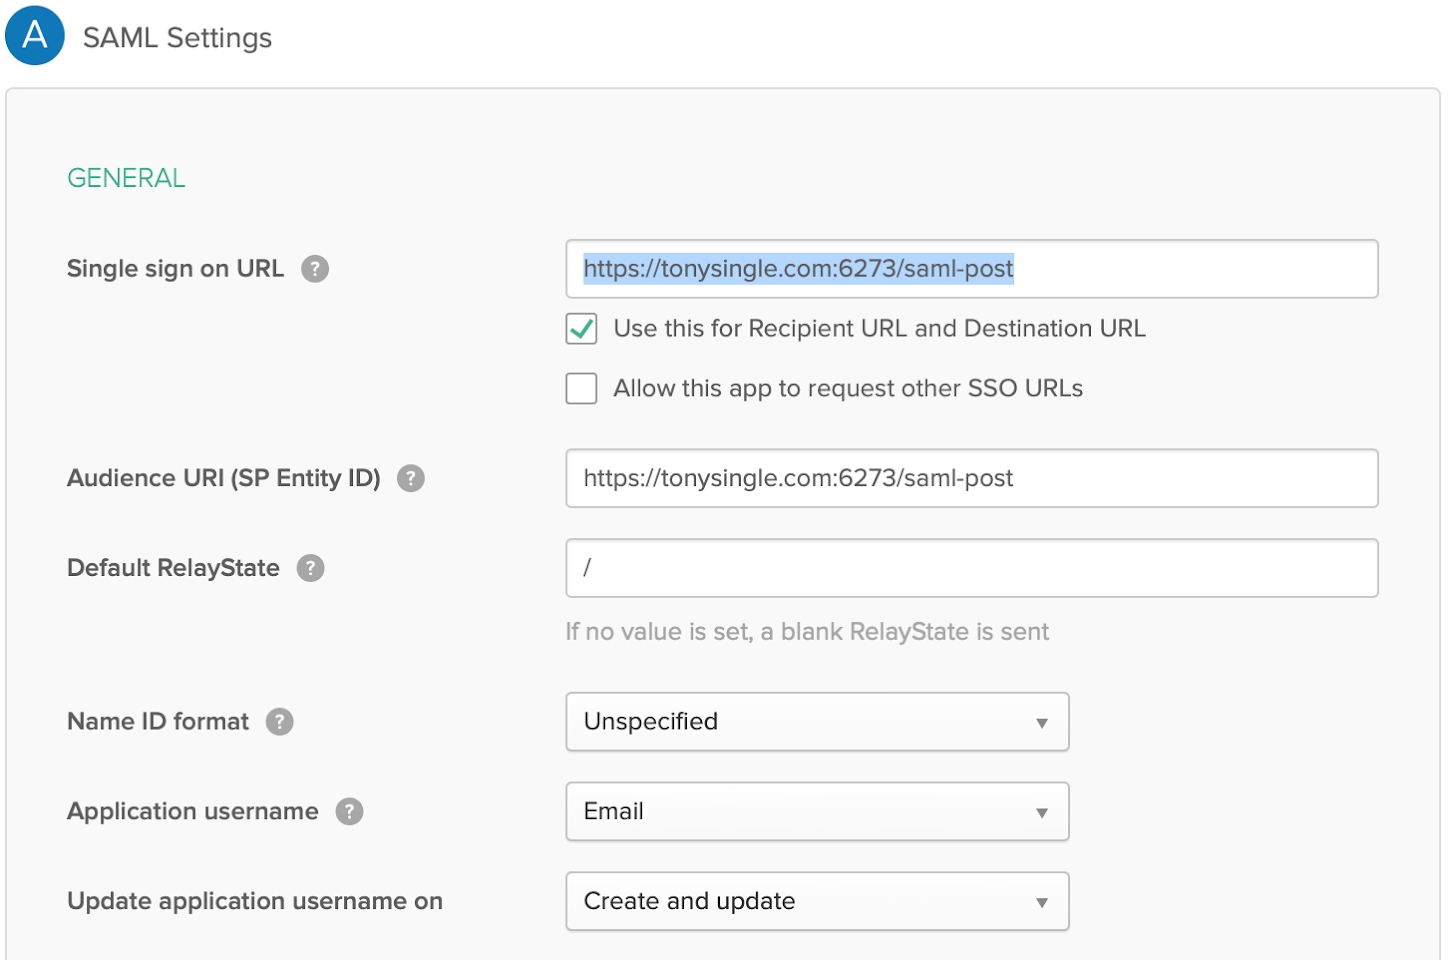
After making your selections, click Next.

8) In the Help Okta Support... page, click I'm an Okta customer adding an internal app. All other questions on this page are optional.

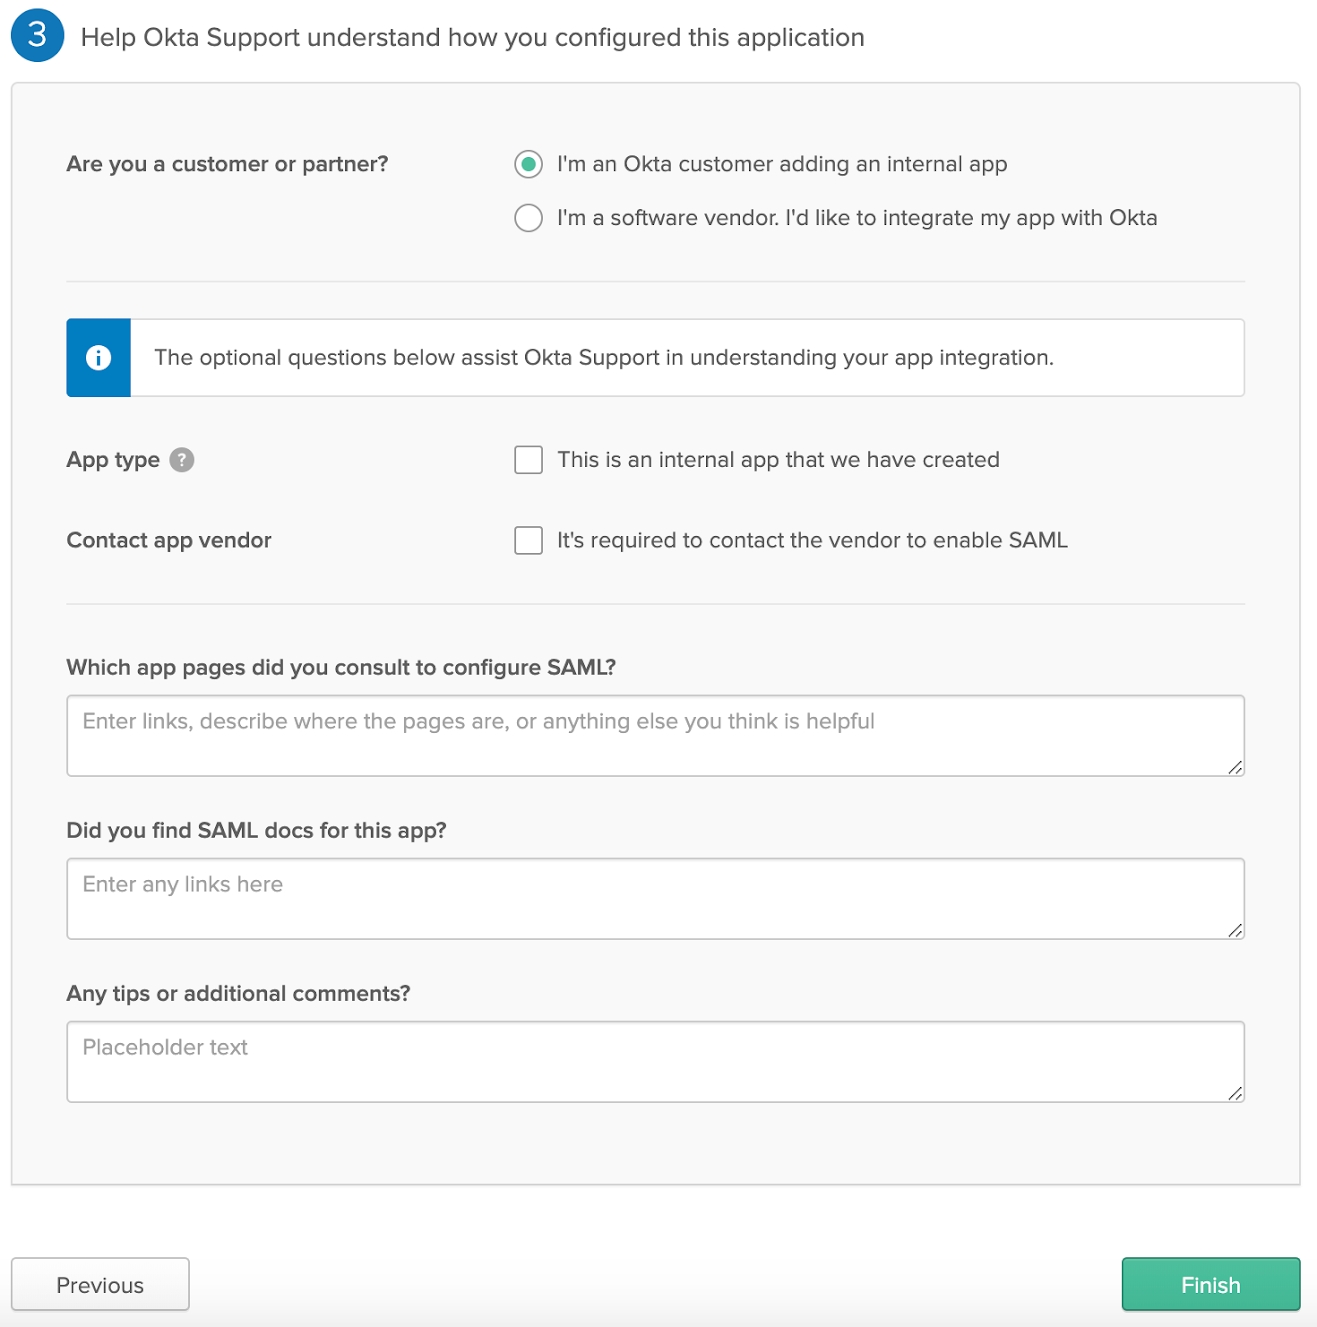
After making your selections, click Finish.

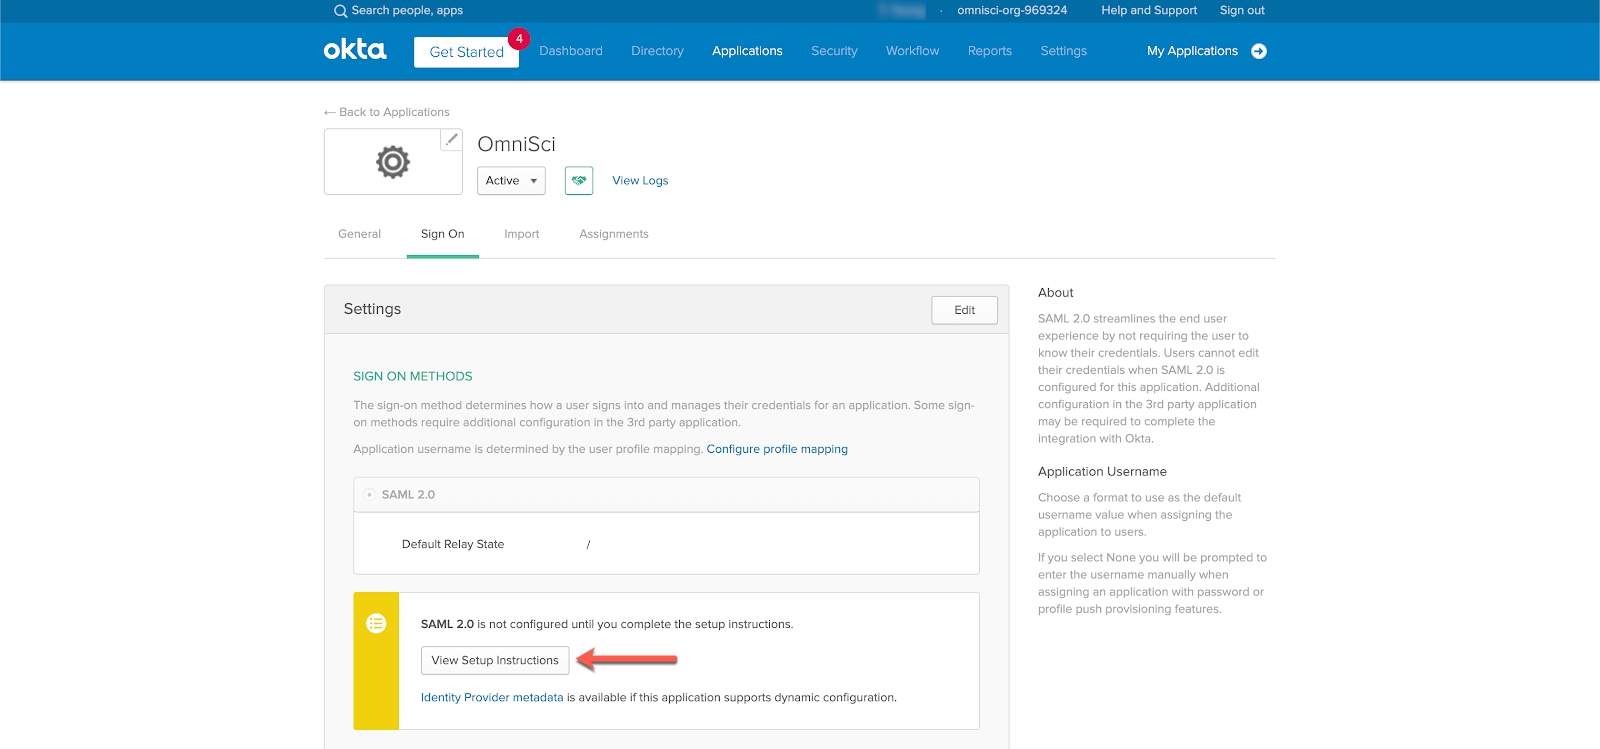
Your application is now registered and displayed, and the Sign On tab is selected.

Configuring SAML for Your HEAVY.AI Application

Before configuring SAML, make sure that HTTPS is enabled on your web server.

On the Sign On tab, configure SAML settings for your application:

1) On the Settings page, click View Setup Instructions.

2) On the How to Configure SAML 2.0 for HEAVY.AI Application page, scroll to the bottom, copy the XML fragment in the Provide the following IDP metadata to your SP provider box, and save it as a raw text file called idp.xml.

3) Upload idp.xml to your HEAVY.AI server in $HEAVYAI_STORAGE.

4) Edit heavy.conf and add the following configuration parameters:

  • saml-metadata-file: Path to the idp.xml file you created.

  • saml-sp-target-url: Web URL to your Heavy Immerse saml-post endpoint.

  • saml-signed-assertion: Boolean value that determines whether Okta signs the assertion; true by default.

  • saml-signed-response: Boolean value that determines whether Okta signs the response; true by default.

    For example:

    saml-metadata-file = "/heavyai-storage/idp.xml"
    saml-sp-target-url = "https://tonysingle.com:6273/saml-post"
    saml-signed-assertion = true
    saml-signed-response = true
  • In the web section, add the full physical path to the servers.json file; for example:

    [web]
    enable-https = true
    cert = "/heavyai-storage/ssl/server.crt"
    key = "/heavyai-storage/ssl/server.key"
    servers-json = "/heavyai-storage/servers.json"

5) On the How to Configure SAML 2.0 for HEAVY.AI Application page, copy the Identity Provider Single Sign-On URL, which looks similar to this:

https://heavyai-tony.okta.com/app/heavyaiorg969324_heavyai_2/exk1p0m4blWiBsFiU357/sso/saml

6) If the servers.json file you identified in the [web] section of heavy.conf does not exist, create it. In servers.json, include the SAMLurl property, using the same value you copied in Identify Provider Single Sign-On URL. For example:

 [
  {
    "enableJupyter": true,
     "url": "tonysingle.com",
     "port": "6273",
    "SAMLurl":"https://heavyai-tony.okta.com/app/heavyaiorg969324_heavyai_2/exk1p0m4blWiBsFiU357/sso/saml"
  }
]

7) Restart the heavyai_server and heavyai_web_server services.

Auto-Creating Users with SAML

Users can be automatically created in HEAVY.AI based on group membership:

1) Go to the Application Configuration page for the HEAVY.AI application in Okta.

2) On the General tab, scroll to the SAML Settings section and click the Edit button.

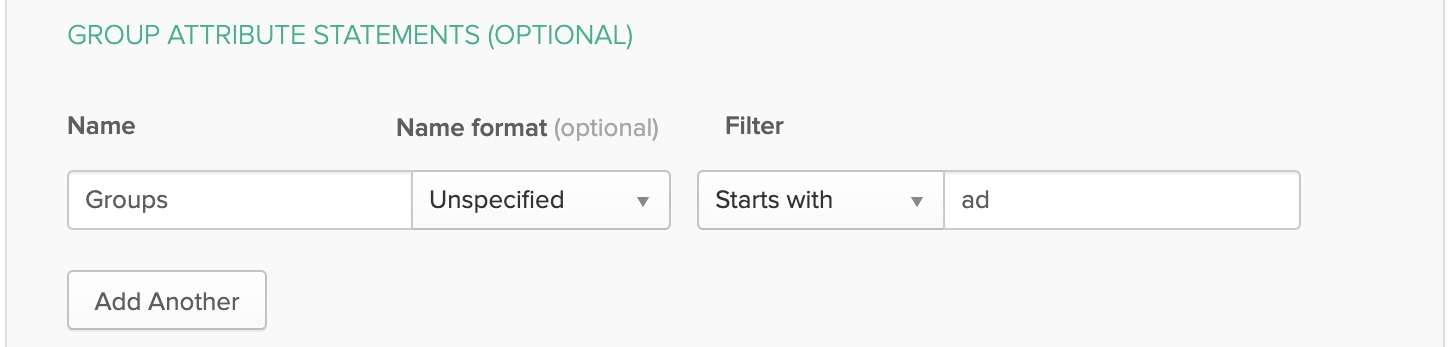
3) Click the Next button, and then in the Group Attribute Statements section, set the following:

  • Name: Groups

  • Filter: Set to the desired filter type to determine the set of groups delivered to HEAVY.AI through the SAML response. In the text box next to the Filter type drop-down box, enter the text that defines the filter.

  • Click Next, and then click Finish.

Any group that requires access to HEAVY.AI must be created in HEAVY.AI before users can log in.

  1. Modify your heavyai.conf file by adding the following parameter:

    saml-sync-roles = true

    The heavyai.conf entries now look like this:

    saml-metadata-file = "/heavyai-storage/idp.xml"
    saml-sp-target-url = "https://tonysingle.com:6273/saml-post"
    saml-sync-roles = true
  2. Restart the heavyai_server and heavyai_web_server processes.

Users whose group membership in Okta contains a group name that exists in HeavyDB can log in and have the privileges assigned to their groups.

Creating Users Manually

1) On the Okta website, on the Assignments tab, click Assign > Assign to People.

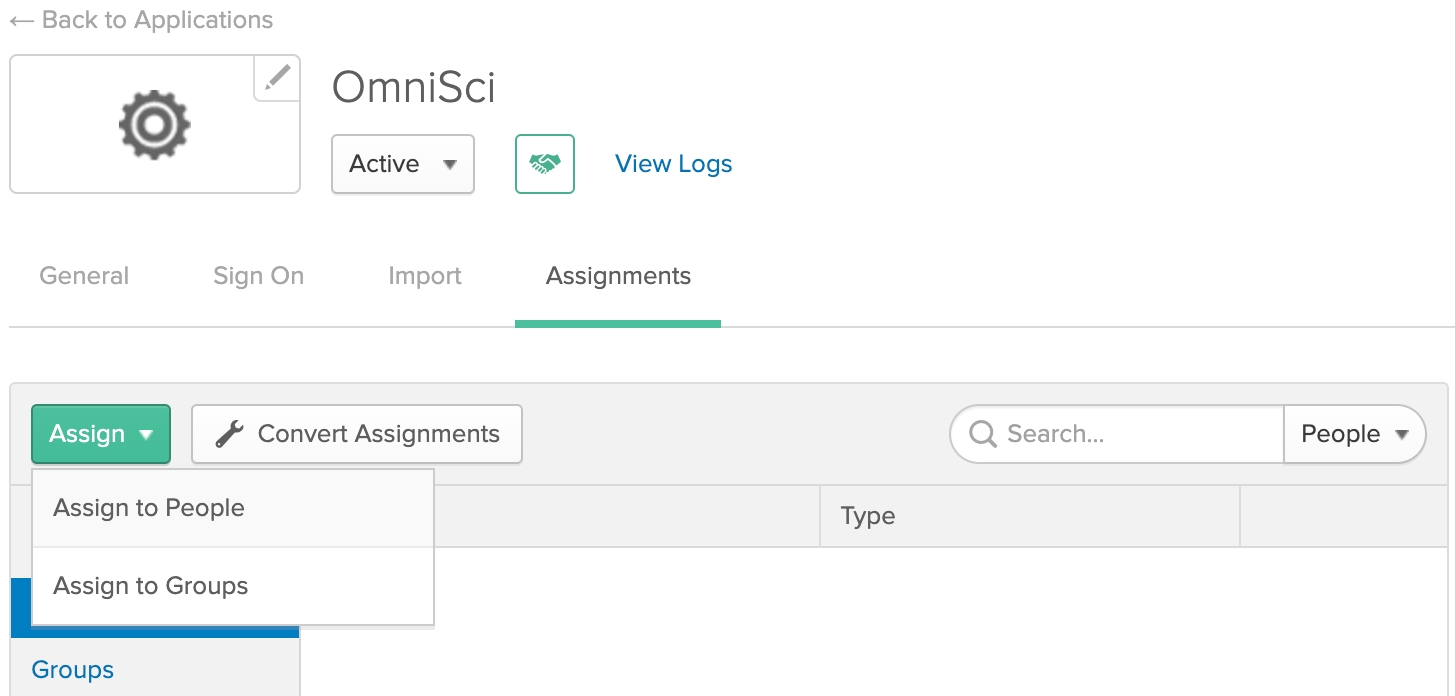
2) On the Assign HEAVY.AI to People panel, click the Assign button next to users that you want to provide access to HEAVY.AI.

3) Click Save and Go Back to assign HEAVY.AI to the user.

) Repeat steps 2 and 3 for all users to whom you want to grant access. Click Done when you are finished.

Verifying SAML Configuration

Verify that the SAML is configured correctly by opening your Heavy Immerse login page. You should be automatically redirected to the Okta login page, and then back to Immerse, without entering credentials.

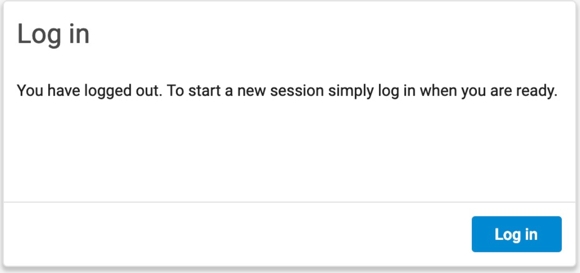
When you log out of Immerse, you see the following screen:

Logging out of Immerse does not log you out of Okta. If you log back in to Immerse and are still logged in to Okta, you do not need to reathenticate.

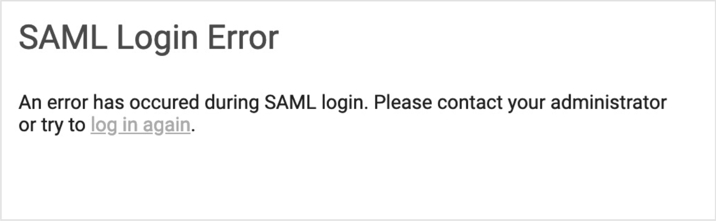
If authentication fails, you see this error message when you attempt to log in through Okta:

To resolve the authentication error:

  1. Add the license information by either:

    • Adding heavyai.license to your HEAVY.AI data directory.

    • Logging in to HeavyDB and run the following command:

      heavysql> \set_license
  2. Reattempt login through Okta.

The Information about authentication errors can be found in the log files.

Begin by adding your SAML application in Okta. If you do not have an Okta account, you can sign up on the .

Single sign on URL: Your Heavy Immerse web URL with the suffix saml-post; for example, . Select the Use this for Recipient URL and Destination URL checkbox.

User accounts assigned to the HEAVY.AI application in Okta must exist in HEAVY.AI before a user can log in. To have users created automatically based on their group membership, see .

Okta
auth0
Ping Identity
Keycloak
Oracle Access Management
Okta web page
https://tonysingle.com:6273/saml-post
Auto-Creating Users with SAML