HEAVY.AI Docs
v8.1.0
v8.1.0
  • Welcome to HEAVY.AI Documentation
  • Overview
    • Overview
    • Release Notes
  • Installation and Configuration
    • System Requirements
      • Hardware Reference
      • Software Requirements
      • Licensing
    • Installation
      • Free Version
      • Installing on Docker
        • HEAVY.AI Installation using Docker on Ubuntu
      • Installing on Ubuntu
        • HEAVY.AI Installation on Ubuntu
        • Install NVIDIA Drivers and Vulkan on Ubuntu
      • Installing on Rocky Linux / RHEL
        • HEAVY.AI Installation on RHEL
        • Install NVIDIA Drivers and Vulkan on Rocky Linux and RHEL
      • Getting Started on AWS
      • Getting Started on GCP
      • Getting Started on Azure
      • Getting Started on Kubernetes (BETA)
      • Upgrading
        • Upgrading HEAVY.AI
        • Upgrading from Omnisci to HEAVY.AI 6.0
        • CUDA Compatibility Drivers
      • Uninstalling
      • Ports
    • Services and Utilities
      • Using Services
      • Using Utilities
    • Executor Resource Manager
    • Configuration Parameters
      • Overview
      • Configuration Parameters for HeavyDB
      • Configuration Parameters for HEAVY.AI Web Server
      • Configuration Parameters for HeavyIQ
    • Security
      • Roles and Privileges
        • Column-Level Security
      • Connecting Using SAML
      • Implementing a Secure Binary Interface
      • Encrypted Credentials in Custom Applications
      • LDAP Integration
    • Distributed Configuration
  • Loading and Exporting Data
    • Supported Data Sources
      • Kafka
      • Using HeavyImmerse Data Manager
      • Importing Geospatial Data
    • Command Line
      • Loading Data with SQL
      • Exporting Data
  • SQL
    • Data Definition (DDL)
      • Datatypes
      • Users and Databases
      • Tables
      • System Tables
      • Views
      • Policies
      • Comment
    • Data Manipulation (DML)
      • SQL Capabilities
        • ALTER SESSION SET
        • ALTER SYSTEM CLEAR
        • DELETE
        • EXPLAIN
        • INSERT
        • KILL QUERY
        • LIKELY/UNLIKELY
        • SELECT
        • SHOW
        • UPDATE
        • Arrays
        • Logical Operators and Conditional and Subquery Expressions
        • Table Expression and Join Support
        • Type Casts
      • Geospatial Capabilities
        • Uber H3 Hexagonal Modeling
      • Functions and Operators
      • System Table Functions
        • generate_random_strings
        • generate_series
        • tf_compute_dwell_times
        • tf_feature_self_similarity
        • tf_feature_similarity
        • tf_geo_rasterize
        • tf_geo_rasterize_slope
        • tf_graph_shortest_path
        • tf_graph_shortest_paths_distances
        • tf_load_point_cloud
        • tf_mandelbrot*
        • tf_point_cloud_metadata
        • tf_raster_contour_lines; tf_raster_contour_polygons
        • tf_raster_graph_shortest_slope_weighted_path
        • tf_rf_prop_max_signal (Directional Antennas)
        • ts_rf_prop_max_signal (Isotropic Antennas)
        • tf_rf_prop
      • Window Functions
      • Reserved Words
      • SQL Extensions
      • HeavyIQ LLM_TRANSFORM
  • HeavyImmerse
    • Introduction to HeavyImmerse
    • Admin Portal
    • Control Panel
    • Working with Dashboards
      • Dashboard List
      • Creating a Dashboard
      • Configuring a Dashboard
      • Duplicating and Sharing Dashboards
    • Measures and Dimensions
    • Using Parameters
    • Using Filters
    • Using Cross-link
    • Chart Animation
    • Multilayer Charts
    • SQL Editor
    • Customization
    • Joins (Beta)
    • Chart Types
      • Overview
      • Bubble
      • Choropleth
      • Combo
      • Contour
      • Cross-Section
      • Gauge
      • Geo Heatmap
      • Heatmap
      • Linemap
      • Number
      • Pie
      • Pointmap
      • Scatter Plot
      • Skew-T
      • Table
      • Text Widget
      • Wind Barb
    • Deprecated Charts
      • Bar
      • Combo - Original
      • Histogram
      • Line
      • Stacked Bar
    • HeavyIQ SQL Notebook
  • HEAVYIQ Conversational Analytics
    • HeavyIQ Overview
      • HeavyIQ Guidance
  • HeavyRF
    • Introduction to HeavyRF
    • Getting Started
    • HeavyRF Table Functions
  • HeavyConnect
    • HeavyConnect Release Overview
    • Getting Started
    • Best Practices
    • Examples
    • Command Reference
    • Parquet Data Wrapper Reference
    • ODBC Data Wrapper Reference
    • Raster Data Wrapper Reference
  • HeavyML (BETA)
    • HeavyML Overview
    • Clustering Algorithms
    • Regression Algorithms
      • Linear Regression
      • Random Forest Regression
      • Decision Tree Regression
      • Gradient Boosting Tree Regression
    • Principal Components Analysis
  • Python / Data Science
    • Data Science Foundation
    • JupyterLab Installation and Configuration
    • Using HEAVY.AI with JupyterLab
    • Python User-Defined Functions (UDFs) with the Remote Backend Compiler (RBC)
      • Installation
      • Registering and Using a Function
      • User-Defined Table Functions
      • RBC UDF/UDTF Example Notebooks
      • General UDF/UDTF Tutorial Notebooks
      • RBC API Reference
    • Ibis
    • Interactive Data Exploration with Altair
    • Additional Examples
      • Forecasting with HEAVY.AI and Prophet
  • APIs and Interfaces
    • Overview
    • heavysql
    • Thrift
    • JDBC
    • ODBC
    • Vega
      • Vega Tutorials
        • Vega at a Glance
        • Getting Started with Vega
        • Getting More from Your Data
        • Creating More Advanced Charts
        • Using Polys Marks Type
        • Vega Accumulator
        • Using Transform Aggregation
        • Improving Rendering with SQL Extensions
      • Vega Reference Overview
        • data Property
        • projections Property
        • scales Property
        • marks Property
      • Migration
        • Migrating Vega Code to Dynamic Poly Rendering
      • Try Vega
    • RJDBC
    • SQuirreL SQL
    • heavyai-connector
  • Tutorials and Demos
    • Loading Data
    • Using Heavy Immerse
    • Hello World
    • Creating a Kafka Streaming Application
    • Getting Started with Open Source
    • Try Vega
  • Troubleshooting and Special Topics
    • FAQs
    • Troubleshooting
    • Vulkan Renderer
    • Optimizing
    • Known Issues and Limitations
    • Logs and Monitoring
    • Archived Release Notes
      • Release 6.x
      • Release 5.x
      • Release 4.x
      • Release 3.x
Powered by GitBook
On this page
  • Assumptions
  • Preparation
  • Update and Reboot
  • JDK
  • Create the HEAVY.AI User
  • Installation
  • Install NVIDIA Drivers ᴳᴾᵁ ᴼᴾᵀᴵᴼᴺ
  • Installing with DNF
  • Installing with a Tarball
  • Configuration
  • Set Environment Variables
  • Initialization
  • Activation
  • Configure the Firewall ᴼᴾᵀᴵᴼᴺᴬᴸ
  • Licensing HEAVY.AI ᵉᵉ⁻ᶠʳᵉᵉ ᵒⁿˡʸ
  • Final Checks
  • Create a Dashboard Using Heavy Immerse ᵉᵉ⁻ᶠʳᵉᵉ ᵒⁿˡʸ ¹
Export as PDF
  1. Installation and Configuration
  2. Installation
  3. Installing on Rocky Linux / RHEL

HEAVY.AI Installation on RHEL

This is an end-to-end recipe for installing HEAVY.AI on a Red Hat Enterprise 8.x machine using CPU and GPU devices.

The order of these instructions is significant. To avoid problems, install each component in the order presented.

The same instructions can be used to install on RL / RHEL 9, which some minor modifications.

Assumptions

These instructions assume the following:

  • You are installing a "clean" Rocky Linux / RHEL 8 host machine with only the operating system.

  • Your HEAVY.AI host only runs the daemons and services required to support HEAVY.AI.

  • Your HEAVY.AI host is connected to the Internet.

Preparation

Prepare your machine by updating your system and optionally enabling or configuring a firewall.

Update and Reboot

Update the entire system and reboot the system if needed.

sudo dnf -y update
sudo reboot

Install the utilities needed to create HEAVY.AI repositories and download installation binaries.

sudo dnf -y install dnf-utils curl libldap2-dev

JDK

  1. Open a terminal on the host machine.

  2. Install the headless JDK using the following command:

sudo dnf -y install java-1.8.0-openjdk-headless

Create the HEAVY.AI User

Create a group called heavyai and a user named heavyai, who will own HEAVY.AI software and data on the file system.

You can create the group, user, and home directory using the useradd command with the --user-group and --create-home switches:

sudo useradd --user-group --create-home --groups wheel heavyai

Set a password for the user using the passwd command.

sudo passwd heavyai

Log in with the newly created user.

sudo su - heavyai

Installation

There are two ways to install the heavy.ai software

Using the DNF package manager for installation is highly recommended due to its ability to handle dependencies and streamline the installation process, making it a preferred choice for many users.

Install NVIDIA Drivers ᴳᴾᵁ ᴼᴾᵀᴵᴼᴺ

If your system includes NVIDIA GPUs but the drivers are not installed, it is advisable to install them before proceeding with the suite installation.

Installing with DNF

Create a DNF repository depending on the edition (Enterprise, Free, or Open Source) and execution device (GPU or CPU) you will use.

sudo  dnf config-manager --add-repo \
https://releases.heavy.ai/ee/yum/stable/cuda
sudo yum-config-manager --add-repo \
https://releases.heavy.ai/ee/yum/stable/cpu
sudo yum-config-manager --add-repo \
https://releases.heavy.ai/os/yum/stable/cuda
sudo yum-config-manager --add-repo \
https://releases.heavy.ai/os/yum/stable/cpu

Add the GPG-key to the newly added repository.

sudo dnf config-manager --save \
--setopt="releases.heavy*.gpgkey=https://releases.heavy.ai/GPG-KEY-heavyai"

Use DNF to install the latest version of HEAVY.AI.

sudo dnf -y install heavyai.x86_64

You can use the DNF package manager to list the available packages when installing a specific version of HEAVY.AI, such as when a multistep upgrade is necessary, or a specific version is needed for any other reason. sudodnf --showduplicateslistheavyai Select the version needed from the list (e.g. 7.0.0) and install using the command.

sudodnfinstallheavyai-7.0.0_20230501_be4f51b048-1.x86_64

Installing with a Tarball

Let's begin by creating the installation directory.

sudo mkdir /opt/heavyai && sudo chown $USER /opt/heavyai

Download the archive and install the latest version of the software. The appropriate archive is downloaded based on the edition (Enterprise, Free, or Open Source) and the device used for runtime.

curl \
https://releases.heavy.ai/ee/tar/heavyai-ee-latest-Linux-x86_64-render.tar.gz \
| sudo tar zxf - --strip-components=1 -C /opt/heavyai
curl \
https://releases.heavy.ai/ee/tar/heavyai-ee-latest-Linux-x86_64-cpu.tar.gz \
| sudo tar zxf - --strip-components=1 -C /opt/heavyai
curl \
https://releases.heavy.ai/os/tar/heavyai-os-latest-Linux-x86_64.tar.gz \
| sudo tar zxf - --strip-components=1 -C /opt/heavyai
curl \
https://releases.heavy.ai/os/tar/heavyai-os-latest-Linux-x86_64-cpu.tar.gz \
| sudo tar zxf - --strip-components=1 -C /opt/heavyai

Configuration

Follow these steps to configure your HEAVY.AI environment.

Set Environment Variables

For your convenience, you can update .bashrc with these environment variables

echo "# HEAVY.AI variable and paths
export HEAVYAI_PATH=/opt/heavyai
export HEAVYAI_BASE=/var/lib/heavyai
export HEAVYAI_LOG=\$HEAVYAI_BASE/storage/log
export PATH=\$HEAVYAI_PATH/bin:$PATH" \
>> ~/.bashrc
source ~/.bashrc

Although this step is optional, you will find references to the HEAVYAI_BASE and HEAVYAI_PATH variables. These variables contain the paths where configuration, license, and data files are stored and the location of the software installation. It is strongly recommended that you set them up.

Initialization

Run the script that will initialize the HEAVY.AI services and database storage located in the systemd folder.

cd $HEAVYAI_PATH/systemd
./install_heavy_systemd.sh

Accept the default values provided or make changes as needed.

This step will take a few minutes if you are installing a CUDA-enabled version of the software because the shaders must be compiled.

The script creates a data directory in $HEAVYAI_BASE/storage (typically /var/lib/heavyai) with the directories catalogs, dataand log, which will contain the metadata, the data of the database tables, and the log files from Immerse's web server and the database. The log folder is particularly important for database administrators. It contains data about the system's health, performance, and user activities.

Activation

Heavy Immerse is not available in the OS Edition.

Start the services and enable the automatic startup of the service at reboot and start the HEAVY.AI services.

sudo systemctl enable heavydb --now
sudo systemctl enable heavy_web_server --now
sudo systemctl enable heavydb --now

Configure the Firewall ᴼᴾᵀᴵᴼᴺᴬᴸ

If a firewall is not already installed and you want to harden your system, install and start firewalld.

sudo dnf -y install firewalld
sudo systemctl start firewalld
sudo systemctl enable firewalld
sudo systemctl status firewalld

To use Heavy Immerse or other third-party tools, you must prepare your host machine to accept incoming HTTP(S) connections. Configure your firewall for external access:

sudo firewall-cmd --zone=public --add-port=6273-6274/tcp --add-port=6278/tcp --permanent
sudo firewall-cmd --reload

Most cloud providers use a different mechanism for firewall configuration. The commands above might not run in cloud deployments.

Licensing HEAVY.AI ᵉᵉ⁻ᶠʳᵉᵉ ᵒⁿˡʸ

  1. Connect to Heavy Immerse using a web browser connected to your host machine on port 6273. For example, http://heavyai.mycompany.com:6273.

  2. When prompted, paste your license key in the text box and click Apply.

  3. Log into Heavy Immerse by entering the default username (admin) and password (HyperInteractive), and then click Connect.

The $HEAVYAI_BASE directory must be dedicated to HEAVYAI; do not set it to a directory shared by other packages.

Final Checks

Load Sample Data and Run a Simple Query

HEAVY.AI ships with two sample datasets of airline flight information collected in 2008, and a census of New York City trees. To install sample data, run the following command.

cd $HEAVYAI_PATH
sudo ./insert_sample_data --data /var/lib/heavyai/storage
#     Enter dataset number to download, or 'q' to quit:
Dataset           Rows    Table Name          File Name
1)    Flights (2008)    7M      flights_2008_7M     flights_2008_7M.tar.gz
2)    Flights (2008)    10k     flights_2008_10k    flights_2008_10k.tar.gz
3)    NYC Tree Census (2015)    683k    nyc_trees_2015_683k    nyc_trees_2015_683k.tar.gz

Connect to HeavyDB by entering the following command in a terminal on the host machine (default password is HyperInteractive):

$HEAVYAI_PATH/bin/heavysql -p HyperInteractive

anEnter a SQL query such as the following:

SELECT origin_city AS "Origin", 
dest_city AS "Destination", 
AVG(airtime) AS "Average Airtime" 
FROM flights_2008_10k WHERE distance < 175 
GROUP BY origin_city, dest_city;

The results should be similar to the results below.

Origin|Destination|Average Airtime
Austin|Houston|33.055556
Norfolk|Baltimore|36.071429
Ft. Myers|Orlando|28.666667
Orlando|Ft. Myers|32.583333
Houston|Austin|29.611111
Baltimore|Norfolk|31.714286

After installing Enterprise or Free Edition, check if Heavy Immerse is running as intended.

  1. Connect to Heavy Immerse using a web browser connected to your host machine on port 6273. For example, http://heavyai.mycompany.com:6273.

  2. Log into Heavy Immerse by entering the default username (admin) and password (HyperInteractive), and then click Connect.

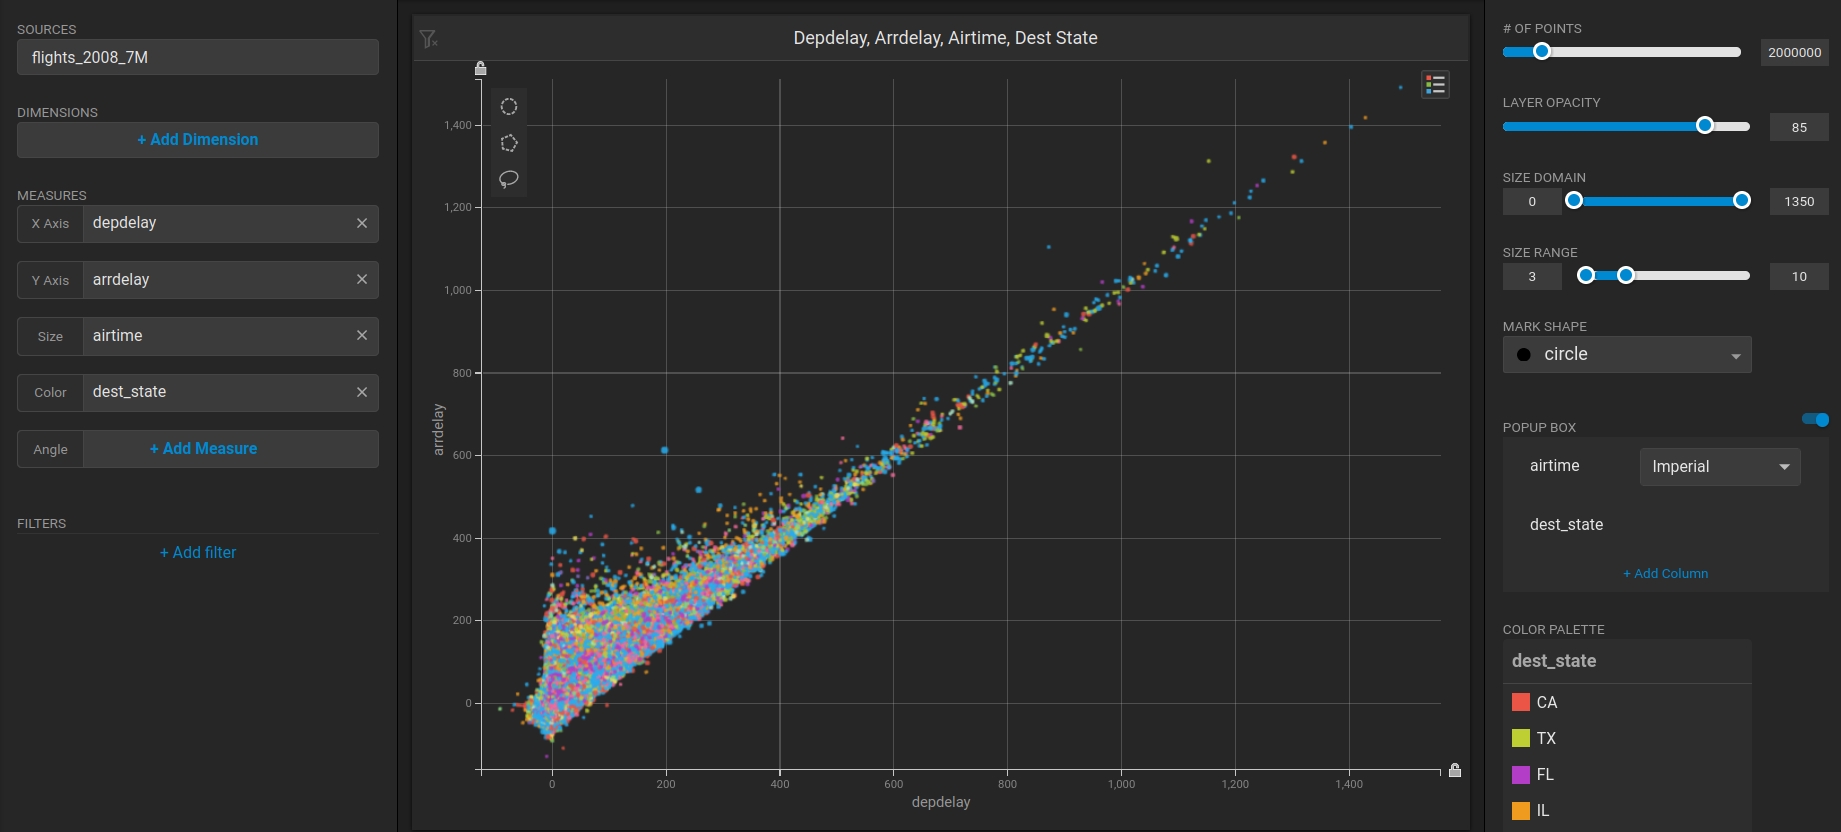
Create a new dashboard and a Scatter Plot to verify that backend rendering is working.

  1. Click New Dashboard.

  2. Click Add Chart.

  3. Click SCATTER.

  4. Click Add Data Source.

  5. Choose the flights_2008_10k table as the data source.

  6. Click X Axis +Add Measure.

  7. Choose depdelay.

  8. Click Y Axis +Add Measure.

  9. Choose arrdelay.

  10. Click Size +Add Measure.

  11. Choose airtime.

  12. Click Color +Add Measure.

  13. Choose dest_state.

The resulting chart clearly demonstrates that there is a direct correlation between departure delay and arrival delay. This insight can help in identifying areas for improvement and implementing strategies to minimize delays and enhance overall efficiency.

Create a new dashboard and a Table chart to verify that Heavy Immerse is working.

  1. Click New Dashboard.

  2. Click Add Chart.

  3. Click Bubble.

  4. Click Select Data Source.

  5. Choose the flights_2008_10k table as the data source

  6. Click Add Dimension.

  7. Choose carrier_name.

  8. Click Add Measure.

  9. Choose depdelay.

  10. Click Add Measure.

  11. Choose arrdelay.

  12. Click Add Measure.

  13. Choose #Records.

The resulting chart shows, unsurprisingly, that also the average departure delay is correlated to the average of arrival delay, while there is quite a difference between Carriers.

¹ In the OS Edition, Heavy Immerse is unavailable.

² The OS Edition does not require a license key.

PreviousInstalling on Rocky Linux / RHELNextInstall NVIDIA Drivers and Vulkan on Rocky Linux and RHEL

Last updated 8 months ago

Follow these instructions to install a headless JDK and configure an environment variable with a path to the library. The “headless” Java Development Kit does not provide support for keyboard, mouse, or display systems. It has fewer dependencies and is best suited for a server host. For more information, see .

To install software using DNF's package manager, you can utilize DNF's package management capabilities to search for and then install the desired software. This method provides a convenient and efficient way to manage software installations and dependencies on your system.

Installing via a tarball involves obtaining a compressed archive file (tarball) from the software's official source or repository. After downloading the tarball, you would need to extract its contents and follow the installation instructions provided by the software developers. This method allows for manual installation and customization of the software.

See I for details.

The first step to activate the system is starting HeavyDB and the Web Server service that Heavy Immerse needs.

For more information, see .

If you are on Enterprise or Free Edition, you need to validate your HEAVY.AI instance with your license key. You can skip this section if you are using Open Source Edition.

Copy your license key from the registration email message. If you have not received your license key, contact your Sales Representative or register for your 30-day trial .

To verify that everything is working, load some sample data, perform a heavysql query, and generate a Pointmap using Heavy Immerse.

Create a Dashboard Using Heavy Immerse ᵉᵉ⁻ᶠʳᵉᵉ ᵒⁿˡʸ

https://openjdk.java.net
nstall NVIDIA Drivers and Vukan on Rocky Linux and RHEL
https://fedoraproject.org/wiki/Firewalld?rd=FirewallD
here
DNF Installation
Tarball Installation
¹
²
¹
¹
Gpu Drawed Scatterplot
Cpu Drawed Bubble chart