Install NVIDIA Drivers and Vulkan on Ubuntu
Installation Prerequisites
Hardware Check
Check that your system has a compatible NVIDIA GPU. If you don't know the exact GPU model in your system run this command:
lspci -v | egrep "NVIDIA"This command should output one row per installed NVIDIA GPU. Check that your hardware is compatible on our Hardware Requirements page. Note that you can still install the CPU Edition of HEAVY.AI on machines that do not have an NVIDIA GPU.
Pre-Installation Updates
Upgrade the system and the kernel, then the machine if needed.
sudo apt updatesudo apt upgrade -y
sudo rebootInstall Kernel Headers
Install kernel headers and development packages.
sudo apt install linux-headers-$(uname -r)Install the extra packages.
sudo apt install pciutilsInstalling Vulkan Library
The rendering engine of HEAVY.AI (present in Enterprise Editions) requires a Vulkan-enabled driver and the Vulkan library. Without these components, the database itself may not be able to start.
Install the Vulkan library and its dependencies using apt.
sudo apt install libvulkan1For more information about troubleshooting Vulkan, see the Vulkan Renderer section.
Installing NVIDIA Drivers
Installing NVIDIA drivers with support for the CUDA platform is required to run GPU-enabled versions of HEAVY.AI.
Each version of HEAVY.AI has a minimum required driver version, which is documented in the Software Requirements page. You can generally install NVIDIA drivers newer than the minimum required version, but the version listed in our Software Requirements page reflects the NVIDIA driver used for software testing.
You can install NVIDIA drivers in multiple ways, we've outlined three available options below - we recommend Option 1.
Option 1: Install NVIDIA drivers with CUDA toolkit from NVIDIA Website
Option 2: Install NVIDIA drivers via .run file using the NVIDIA Website
Option 3: Install NVIDIA drivers using APT package manager
What is CUDA? What is the CUDA toolkit?
CUDA is a parallel computing platform and application programming interface (API) model. It uses a CUDA-enabled graphics processing unit (GPU) for general-purpose processing. The CUDA platform provides direct access to the GPU virtual instruction set and parallel computation elements. For more information on CUDA unrelated to installing HEAVY.AI, see https://developer.nvidia.com/cuda-zone.
The CUDA Toolkit from NVIDIA provides everything you need to develop GPU-accelerated applications. The CUDA Toolkit includes GPU-accelerated libraries, a compiler, development tools and the CUDA runtime. The CUDA Toolkit is not required to run HEAVY.AI, but you must install the CUDA toolkit if you use advanced features like C++ User-Defined Functions and or User-Defined Table Functions to extend the database capabilities.
Option 1: Install NVIDIA Drivers with CUDA Toolkit from NVIDIA Website
Open https://developer.nvidia.com/cuda-toolkit-archive and select the desired CUDA Toolkit version to install.
In the "Target Platform" section, follow these steps:
For "Operating System" select Linux
For Architecture" select x86_64
For "Distribution" select Ubuntu
For "Version" select the version of your operating system (20.04)
For "Installer Type" choose deb (network) **
One by one, run the presented commands in the Installer Instructions section on your server.
Option 2: Install NVIDIA Drivers via .run file using the NVIDIA Website
Install the CUDA package for your platform and operating system according to the instructions on the NVIDIA website (https://www.nvidia.com/download/index.aspx).
If you don't know the exact GPU model in your system run this command
lspci -v | egrep "3D|VGA*.NVIDIA" | awk -F '\[|\]' ' { print $2 } 'You'll get an output in the format Product Type, Series and Model
Tesla T4In this example, the Product type is Tesla the Series is T (as Turing), and the model is T4.
Select the Product Type as the one you got with the command.
Select the correct Product Series and Product Type for your installation.
In the Operating System dropdown list, select Linux 64-bit.
In the CUDA Toolkit dropdown list, click a supported version (11.4 or higher).
Click Search.
On the resulting page, verify the download information and click Download
On the subsequent page, if you agree to the terms, right click on "Agree and Download" and select "Copy Link Address". You may also manually download and transfer to your server, skipping the next step.
On your server, type
wgetand paste the URL you copied in the previous step. Press enter to download.
Install the tools needed for installation.
sudo apt install build-essentialChange the permissions of the downloaded .run file to allow execution, and run the installation.
chmod +x NVIDIA-Linux-x86_64-*.run
sudo ./NVIDIA-Linux--x86_64-*.run
Option 3: Install NVIDIA drivers using APT
Install a specific version of the driver for your GPU by installing the NVIDIA repository and using the apt package manager.
Run the command to get a list of the available driver's version
apt list nvidia-driver-*
Listing... Done

nvidia-driver-450/bionic-updates,bionic-security 460.91.03-0ubuntu0.18.04.1 amd64
nvidia-driver-450-server/bionic-updates,bionic-security 450.172.01-0ubuntu0.18.04.1 amd64
nvidia-driver-455/bionic-updates,bionic-security 460.91.03-0ubuntu0.18.04.1 amd64
nvidia-driver-460/bionic-updates,bionic-security 470.103.01-0ubuntu0.18.04.1 amd64
nvidia-driver-465/bionic-updates,bionic-security 470.103.01-0ubuntu0.18.04.1 amd64
nvidia-driver-470/bionic-updates,bionic-security 470.103.01-0ubuntu0.18.04.1 amd64
nvidia-driver-470-server/bionic-updates,bionic-security 470.103.01-0ubuntu0.18.04.1 amd64
nvidia-driver-495/bionic-updates,bionic-security 510.60.02-0ubuntu0.18.04.1 amd64
nvidia-driver-510/bionic-updates,bionic-security 510.60.02-0ubuntu0.18.04.1 amd64
nvidia-driver-510-server/bionic-updates,bionic-security 510.47.03-0ubuntu0.18.04.1 amd64
Install the driver version needed with apt
sudo apt install nvidia-driver-<version>NVIDIA Driver Post-Installation steps
Reboot your system to ensure the new version of the driver is loaded
sudo rebootVerify Successful NVIDIA driver installation
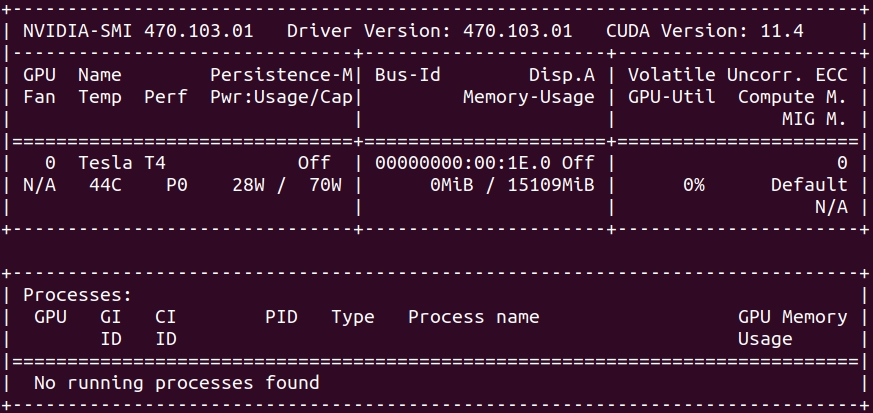
Run nvidia-smi to verify that your drivers are installed correctly and recognize the GPUs in your environment. Depending on your environment, you should see something like this to confirm that your NVIDIA GPUs and drivers are present.
Install Vulkan library
The rendering engine of HEAVY.AI requires a Vulkan-enabled driver and the Vulkan library. Without these components, the database itself can't even start without disabling the back-end renderer.
Install the Vulkan library and its dependencies using apt.
sudo apt install libvulkan1For more information about troubleshooting Vulkan, see the Vulkan Renderer section.
Advanced Installation
You must install the CUDA toolkit and Clang if you use advanced features like C++ User-Defined Functions and or User-Defined Table Functions to extend the database capabilities.
Install CUDA Toolkit ᴼᴾᵀᴵᴼᴺᴬᴸ
If you installed NVIDIA drivers using Option 1 above, the CUDA toolkit is already installed; you may proceed to the verification step below.
Install the NVIDIA public repository GPG key.
distribution=$(. /etc/os-release;echo $ID$VERSION_ID | sed -e 's/\.//g')
sudo apt-key adv --fetch-keys \
https://developer.download.nvidia.com/compute/cuda/repos/$distribution/x86_64/3bf863cc.pub
Add the repository.
echo "deb http://developer.download.nvidia.com/compute/cuda/repos/$distribution/x86_64 /" \
| sudo tee /etc/apt/sources.list.d/cuda.list
apt update
List the available Cuda toolkit versions.
apt list cuda-toolkit-* | grep -v config

Listing...
cuda-toolkit-10-0/unknown 10.0.130-1 amd64
cuda-toolkit-10-1/unknown 10.1.243-1 amd64
cuda-toolkit-10-2/unknown 10.2.89-1 amd64
cuda-toolkit-11-0/unknown 11.0.3-1 amd64
cuda-toolkit-11-1/unknown 11.1.1-1 amd64
cuda-toolkit-11-2/unknown 11.2.2-1 amd64
cuda-toolkit-11-3/unknown 11.3.1-1 amd64
cuda-toolkit-11-4/unknown 11.4.4-1 amd64
cuda-toolkit-11-5/unknown 11.5.2-1 amd64
cuda-toolkit-11-6/unknown 11.6.2-1 amd64
cuda-toolkit-11-7/unknown 11.7.0-1 amd64
Install the CUDA toolkit using apt.
sudo apt install cuda-toolkit-<version>Verification
Check that everything is working and the toolkit has been installed.
/usr/local/cuda/bin/nvcc --version

nvcc: NVIDIA (R) Cuda compiler driver
Copyright (c) 2005-2020 NVIDIA Corporation
Built on Mon_Nov_30_19:08:53_PST_2020
Cuda compilation tools, release 11.2, V11.2.67
Build cuda_11.2.r11.2/compiler.29373293_0
Install Clang ᴼᴾᵀᴵᴼᴺᴬᴸ
You must install Clang if you use advanced features like C++ User-Defined Functions and or User-Defined Table Functions to extend the database capabilities. Install Clang and LLVM dependencies using apt.
sudo apt install clangVerification
Check that the software is installed and in the execution path.
clang --version
clang version 10.0.0-4ubuntu1
Target: x86_64-pc-linux-gnu
Thread model: posix
InstalledDir: /usr/bin
For more information, see C++ User-Defined Functions.
Last updated